DevMethodVS Tools | Pending Changes
The "Pending Changes" page in Team Explorer is enhanced by DevMethodVS Tools with a "Prepare Check In" pane. This section is designed to streamline your check-in process, ensuring accuracy and adherence to project standards. Here’s an overview of its functionality:
-
Getting Started with Prepare Check In:
- Ensure a Visual Studio project is open and you have a valid connection to your Azure DevOps TFVC repository.
- Work items to be associated with your check-in should be selected in the standard "Related Work Items" section of the Pending Changes page. You can add them via the “Add multiple Work Items” menu in the "Prepare Check In" pane or by dragging and dropping them into the "Related Work Items" section.
- Once work items are related, use the Verify Button in the "Prepare Check In" pane.
- The verification process checks for common issues, such as missing parent work items. If the option is enabled in General Settings, these related items will be added automatically.
-
Important Note for Multi-Project Solutions:
If your Visual Studio solution includes multiple projects, select the appropriate project from the Visual Studio project combo box within the "Prepare Check In" pane to ensure settings and context are applied correctly.
-
Validation Processes:
The "Prepare Check In" pane performs several validations when the Verify Button is pressed, including:
- Ensuring the correct source control branch is active.
- Verifying that the current developer is assigned to the selected tasks.
- Checking the validity of work item states (e.g., not closed if work is being checked in against them).
- Identifying and optionally adding missing related work items.
- Generating a preliminary check-in comment based on selected work items and templates.
- And other process adherence checks.
-
Menu Explained (within "Prepare Check In" pane):
- Verify Button: Click this to validate the selected work items and your pending changes. It checks for correct work item associations (parent/child relationships) and other rules. Issues and suggestions are displayed in the pane.
- Add Missing Work Items Button: If verification identifies missing related work items and they weren't automatically added, this button allows you to add them. (Often redundant if auto-add is enabled in
Tool > Options > DevMethodVS Tools > General Settings). -
Action Menu Functions (often a dropdown or context menu):
- Add Multiple Work Items: Quickly associate multiple work items by entering their IDs.
- Clear Messages: Clears informational or warning messages from the pane.
- Configure Detailed Check In Comment: Opens an interface to customize or provide more detail for the automatically generated check-in comment.
- Reload Settings: Manually refreshes shared DevMethodVS Tools settings from Azure Storage.
-
Finalizing Check-In:
- Once work items are verified and the check-in comment is satisfactory (either auto-generated or customized), select the appropriate check-in reason from the standard Visual Studio options.
- Proceed with the check-in as usual.
Pending Changes - Prepare Check-In Interface
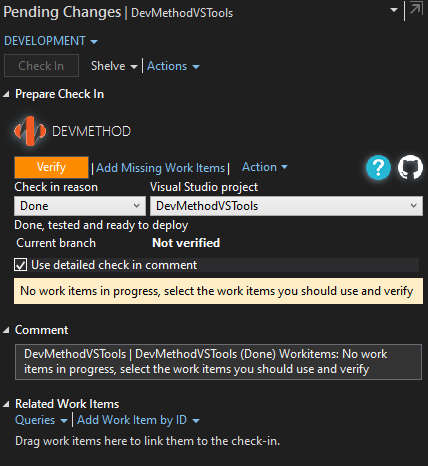
The "Prepare Check In" section within the Pending Changes page in Visual Studio Team Explorer.