DevMethod Tools | Functions overview
The toolkit provides several functional areas as outlined below for the DevMethod Tools application.
1 | Change sets analyze - Tracking change sets between branches.
1. Change Set Analysis
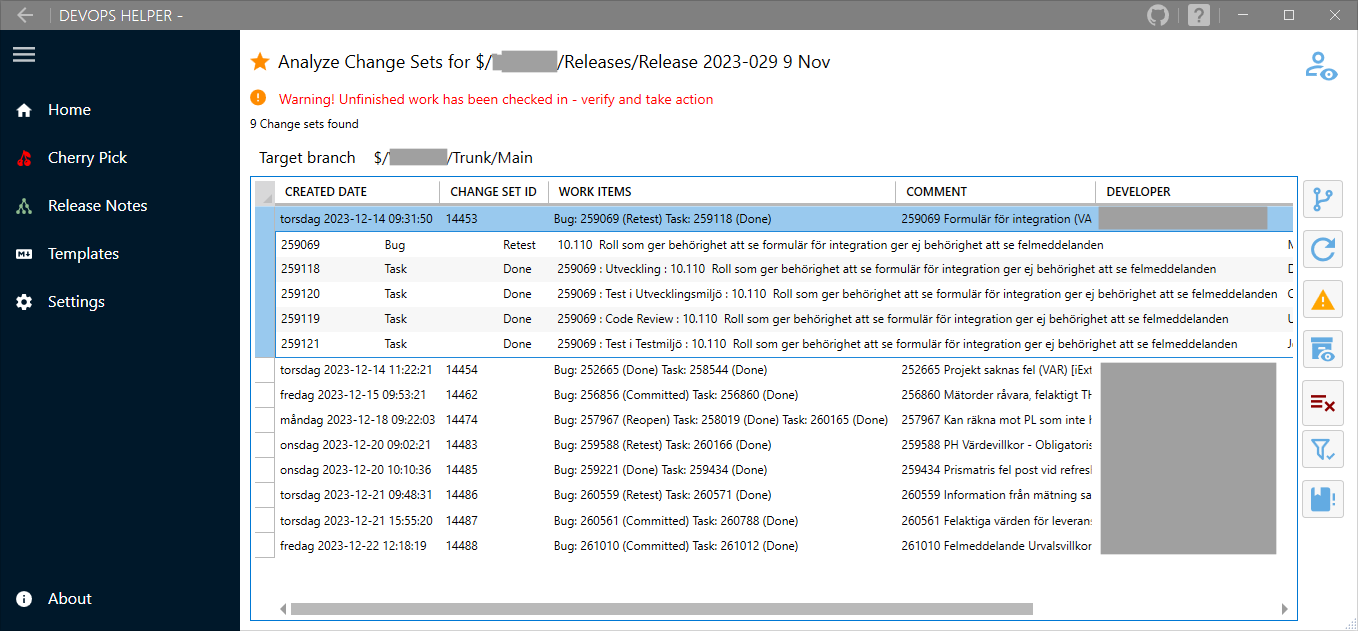
This feature helps identify work items in your project that still require attention, based on your project's workflow. It filters out change sets that need to be moved from one branch to another, while excluding those already merged. The tool clearly highlights change sets linked to work items that need further work.
There are 2 variants of the change set analysis, the variant to use is depending on the branching strategy selected. The change sets are listed in chronological order in the work list, all referenced work items are displayed in a hierarchical data grid, and they can be opened in DevOps, changes in DevOps are reflected in the list. This list is used as an input to decisions that must be made by the project on what to merge to the target branch.
The report serves as a solid foundation upon which the project can base its decisions regarding which change sets should be merged.
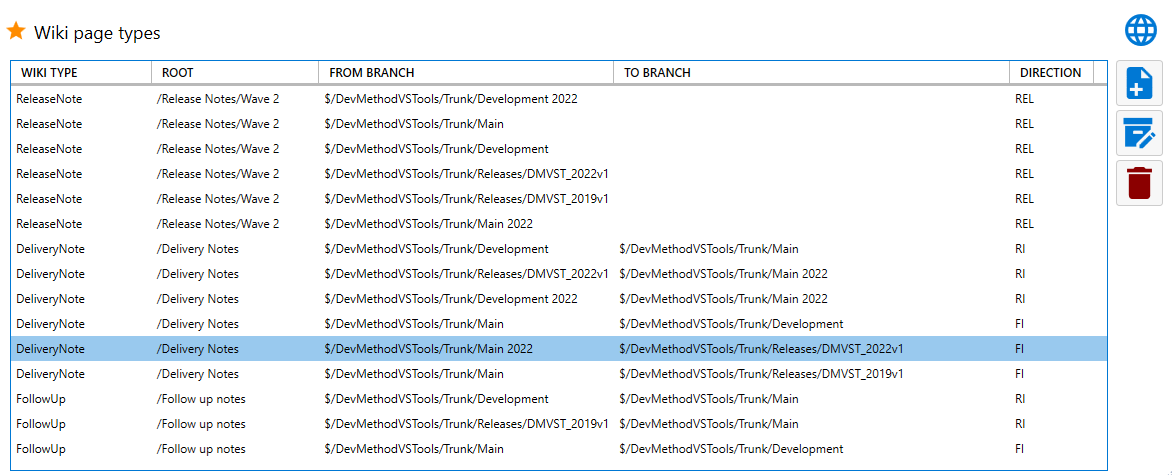
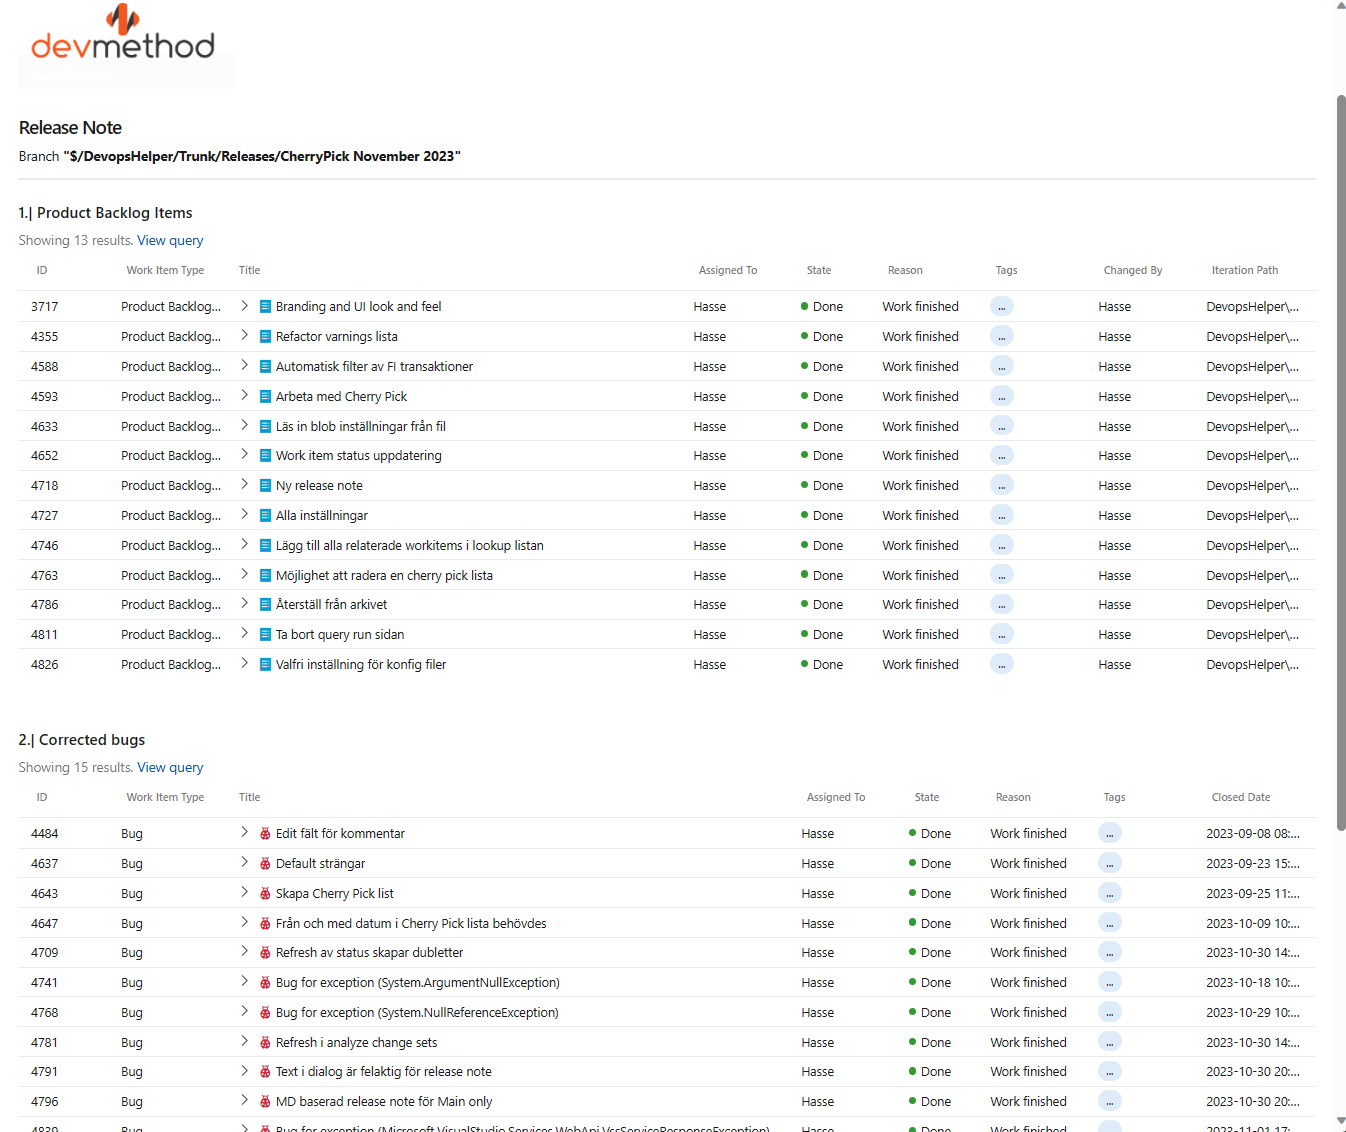
The list can be filtered to only show the work items that need to be addressed, the list can be published on the project Wiki as a “Follow up” note. The "Follow-up" note, which gets published to your project's wiki. This list serves as an action plan for your project, guiding the transfer of work items between branches. An illustrative example of this list can be found below. Please note, the list's layout and language depend on the chosen templates for each report, the list is built with Mark Down and can be freely modified.
Example of a Follow-up note published in the project wiki.

This type of analyzis is the one to use when you have a branching using a development branch, feature branch or hotfix branch for example. A common strategy is the Development and Release isolation strategy.
2. Create a Change Set List
This feature creates a "Change Set List", a comprehensive list of change sets that need to be transferred from one branch to another. This list is beneficial in project meetings, where the status of work items is discussed among team members including the Scrum Master, Test Leader, Project Lead, etc.
An example of the creation of a Change Set List is shown here:
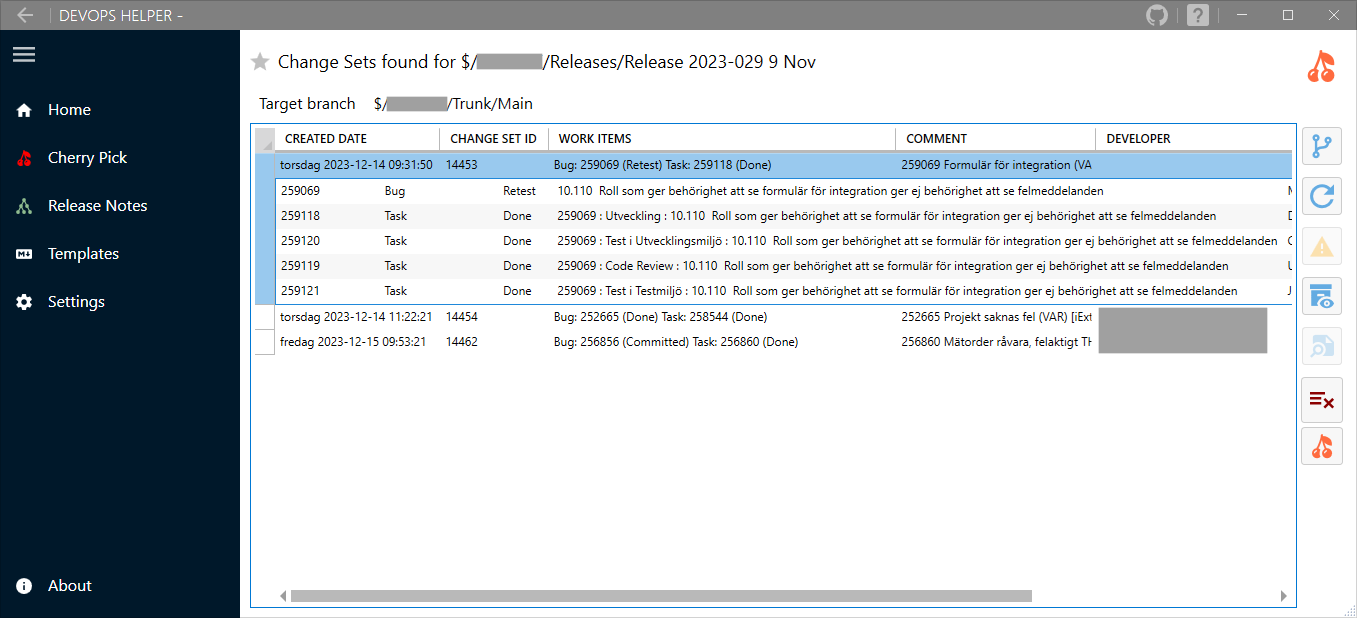
If certain change sets aren't ready for merging, they can be removed from the list. Once the list has been finalized, it becomes accessible from within Visual Studio in any development environment in the project.
The assigned developer in charge of merging uses this as their task list, merging one change set at a time. To ensure traceability of changes, the work items linked in the source branch are also referenced in the target branch.
This preserves the association between change sets and work items across branches. Additionally, the auto-generated check-in comment enhances traceability of these change sets. As depicted in the provided image, the comment seamlessly integrates with the change set tracking feature in Visual Studio. For instance, changeset 2030, which was merged from the development branch to the main branch, is tagged in the Main branch with its origin.
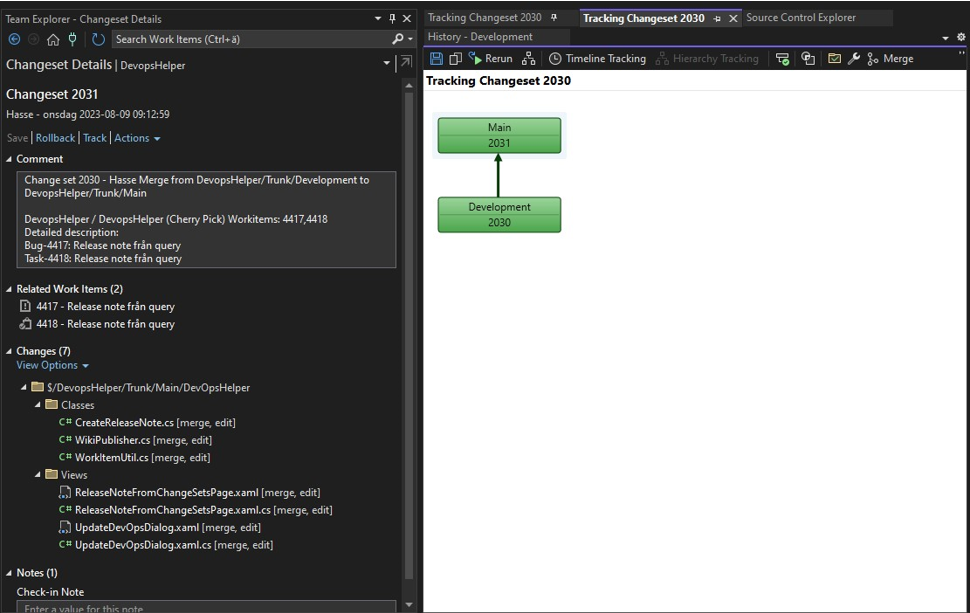
This tagging is pivotal in identifying which change sets need merging and in eliminating unnecessary Forward Integration (FI) transactions, such as when changes are merged from the release to main and then from main to development.
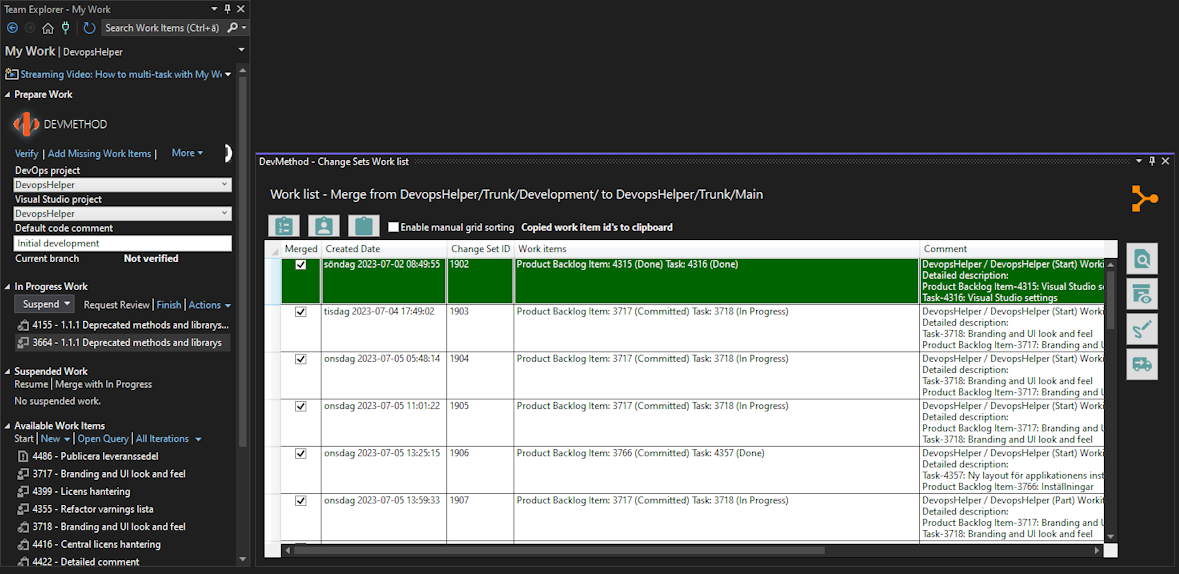
3. Work with a Change Set Work List
This function list all change set lists for all branches, it has the same features as the chang set list in Visual Studio and is only intended for the Lead Developer to inspect and adjust the list if needed. A delivery note can be published from this function to the project wiki.
When a Change Set list is processed and done and signed off by the developer, a “Delivery Note” is published to the project Wiki with a list of all change sets merged from the source branch to the target branch.
Here is an example on how the Change Set list is used from within Visual Studio
2 | Release Notes - The variants.
The release note is possible to create based on different sources, analyze the change sets or the standard DevOps method to take the checked in work items between releases. Both variants is importand and necessary
1. Change Set Release Note.
Based on change sets, Release Note created based on the change sets is useful when the delta between releases don't exists.
This function will analyze the change sets that has been merged from one branch to another. It gives a status overview of what has been done and when, it also is a help when you need to know what remains to do. The list of merged change sets can also create a delivery note published to the project wiki.
The difference between a delivery note based on the delta of work items checked in between releases is that if you have the following scenario, you will not get a release note from the release pipeline from the first release from a branch.
The following scenario is supported.
- Development is done on the development branch, when code review and testing is done in the developer environment the devloper check in the code to the Development branch.
- When test is done on the Development branch, and it is regarded as feature complete the change sets is merged from the Development branch to the Main branch.
- A release branch is created from the Main branch for testing of the release candidate. A release is created and deployed from the release branch. The delivery note from the merge of Development to Main is used as a documentation of what the release will include.
2. Change Set Release Note, (Main only/Release isolation/Feature branch strategy).
Based on change sets, Release Note created based on the change sets is useful when there is only the first release created from the release branch
If you are using a strategy that excludes a development branch, for example a combination off Main only/Release isolation/Feature isolation you will see the same problem that you can’t create a release note based on the checked in code in the release branch as it doesn’t have any change sets with related work items.
This function will analyze the change sets that has been checked in to the main branch since the previous branch created on the main branch. It gives a status overview of what has been done and when, it also is a help when you need to know what remains to do. The actions needed to be able to create a release branch can be generated to a list
The strategy described here is often used and the strategies is applied when the requirements demand it. It is a flexible approach, but you will lose the opportunity to isolate code that can be defective as the development branch is skipped.
-
Initial Release:
- Release 1: When Release 1 is deployed from Release Branch 1 to production, development continues on the Main Branch.
- Change Sets: Code checked into the Main Branch forms change sets, which are linked to relevant work items.
-
Feature Completion and New Branch Creation:
- Once the code on the Main Branch is feature complete, a new branch is created for the upcoming release.
-
Creating Release Notes:
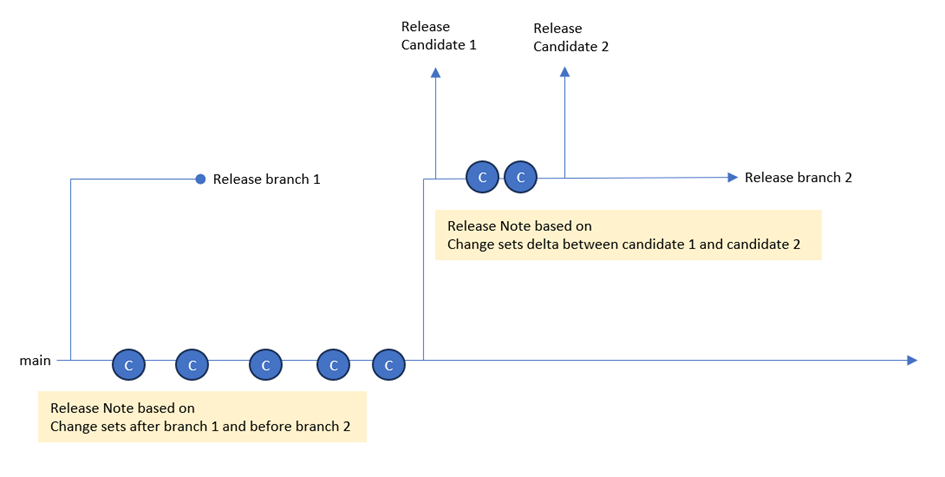
- Initial Release Note: A release note is generated for Release 2. This note includes details about new features in the release and bug fixes made since Release 1. It's based on the change sets from the Main Branch (marked as C).
- Corrections and Subsequent Release Notes: When corrections are committed to the release branch, a separate release note is prepared. This note includes information about the corrections made.
- Content of Release Notes: The release note should primarily contain information from the initial release note. While exceptions may occur, it's important that no new features are developed directly on the release branch.
The process described here can be illustrated as in this picture
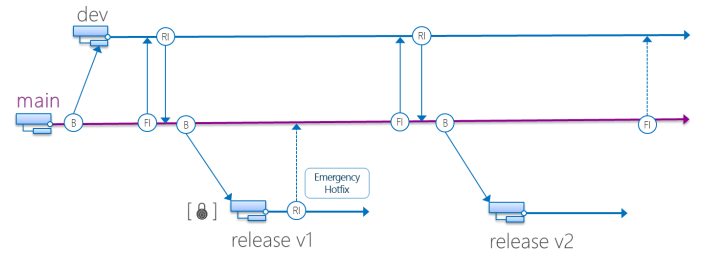
The different strategies discussed here is illustrated here, from the "TFS Version Control Part 1 - Branching Strategies" document
Main only

Feature isolation

Release isolation

3. DevOps Release Note.
Release Note from Release pipeline based on the delta between 2 releases (Azure DevOps standard).
This release note is based on the work items included in the release pipeline, to be able to use this release note, check-in must have been done on the branch so a delta can be created.
The following scenario is supported:
-
-
First Release note is based on change sets merged from Development to Main branch. A release branch is created, and the release note is created from the merge result between Development and Main.
-
- Tests is performed on the release branch and bugs / adjustments must be done. Work items is created and checked in on the release branch
-
- A delta is generated comparing the initial release pipeline to the subsequent release, which can then be used to create a new Release Note. The initial release note can still be considered as the main release note, while the subsequent one can be viewed as a list of issues discovered prior to customer release. The latter serves as a foundation for testing and follow-up.
3 | Templates - Control the content and layout.
The tool consists of templates for different reports and queries, it supports WIQL queries, Mark Down wiki pages, and maintaining of work item templates for the different teams in Azure DevOps.
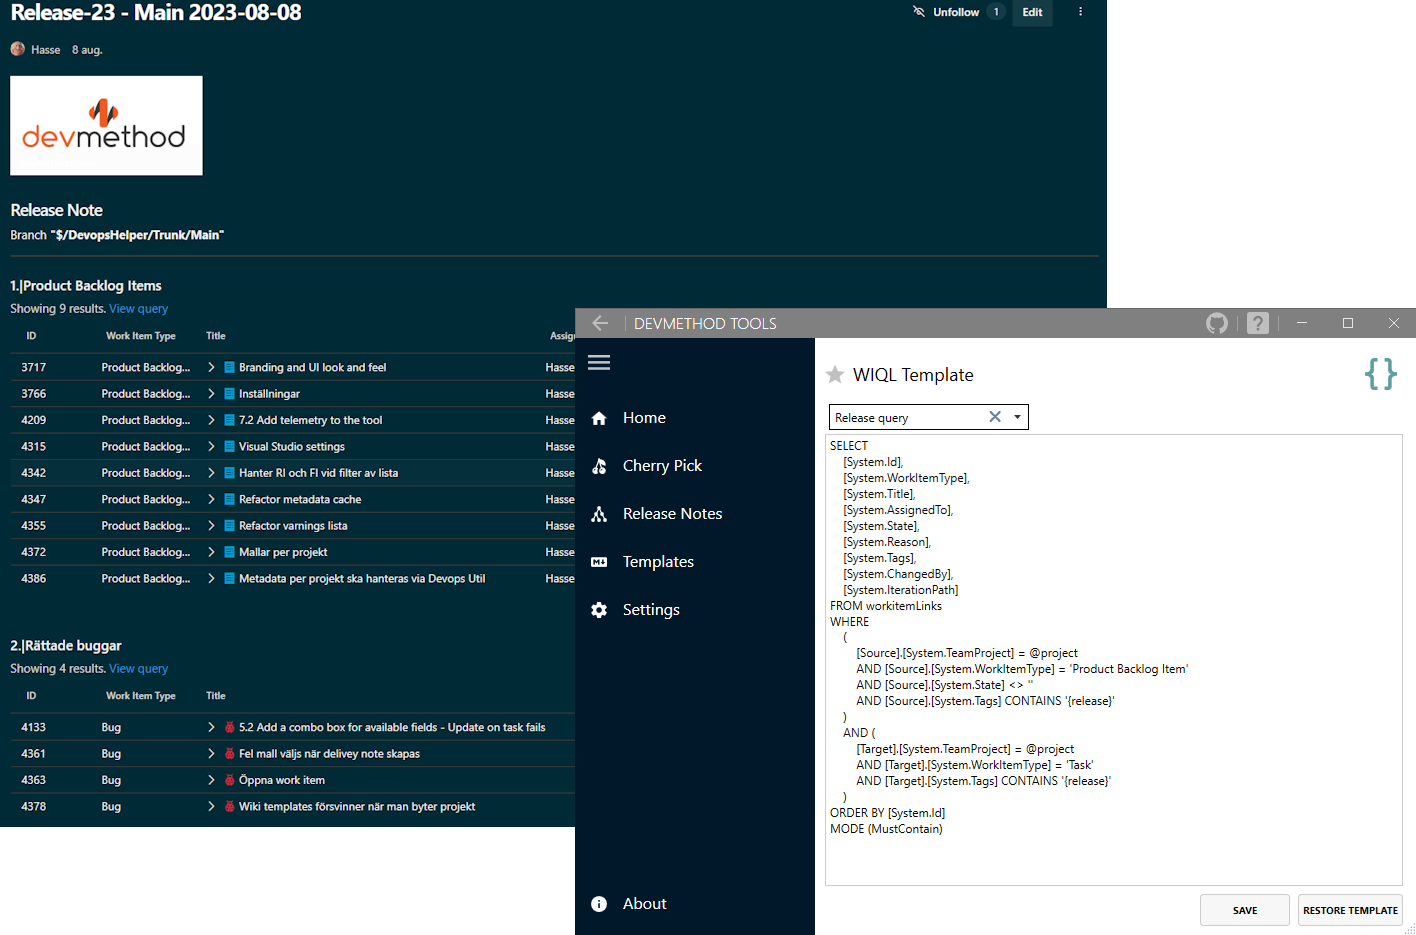
1. WIQL Templates
The WIQL template is used to create query based Release Notes, Release Notes can be created using a query or with Mark Down generated from the result of the release data.
An example of a query-based Release Note is shown here, the content of the Release Note is controlled by the WIQL template and the MD Template.
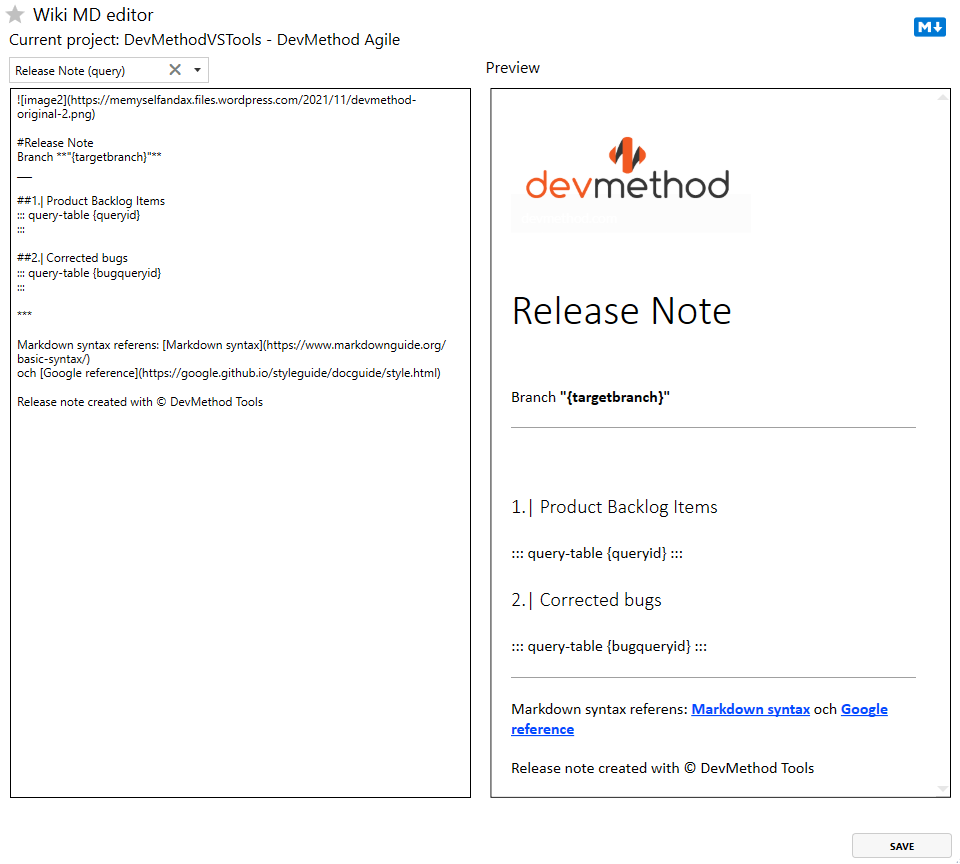
2. Mark Down Editor.
The Mark Down editor is a simple editor with a preview, an example of this is shown here. In the editor you can design your reports in detail. Reports can be based on templates included in the product, the editor also provide lists of constants that can be used in the reports to include data from the change sets.
4 | Settings - Team settings and personal settings.
The tool requires shared settings, and several settings must be established prior to use. Additionally, it necessitates a blob for saving these settings. At present, an Azure storage account is required for this purpose.
Usually, this is not a significant issue, as the D365FO application itself mandates an Azure subscription. Moreover, the expenses associated with data storage from the tool are relatively minimal.
-
Application settings:
-
The setting for the DevMethod tools application is set up here and shared between the users of the tool in creation of different notes.
-
Team's shared Visual Studio settings:
-
The settings for all the developers are setup here in the DevMethod tool, this allow the Lead Developer to setup how the Visual Studio plugin is configured for all developers in the project. This is a centralized function that will make it easy to ensure that there is consistency in how check in comments is written, code is documented, work processes with work items are followed
-
Metadata settings:
-
The metadata settings for the DevMethod tool are a local cache of different work item properties, this is a performance setting.
-
Project settings/Switch project:
-
This function allows the user to connect to another Azure DevOps project, all settings is unique for each project. Login to Azure DevOps is done by using a PAT (Personal Access Token). All settings are saved for each DevOps project.
-
Wiki pages:
-
The Wiki pages setup controls where the different wiki pages generated by the tool will be placed